Content:
Introduction
- Dong, J., Zhao, H., Zhou, T., Spiliotopoulos, D., Rajendran, C., Li, X.D., Huang, D. and Caflisch, A., 2015. Structural analysis of the binding of type I, I1/2, and II inhibitors to Eph tyrosine kinases. ACS medicinal chemistry letters, 6(1), pp.79-83.
- Raw diffraction data
- Table 1, RCSB, PDBe, PDBj
We will be working in a separate directory - and create two subdirectories in there (one for the deposited data and one as a work directory): you should be able to just cut-and-paste the commands given in the green code blocks below. Sometimes those command-lines are broken up using a continuation character (backslash) at the end of a line: this is standard shell syntax and makes them easier to read on the pages here.
Please note that this tutorial was written up using XDS version 20230630!
Getting deposited (raw) data
With a series of shell commands
  mkdir Deposited
  cd Deposited

  # Raw diffraction data
  rsync -av rsync://data.sbgrid.org/10.15785/SBGRID/93 .
  ln -s 93 Images

  # MR search model
  # use "curl -O" instead of "wget" if the latter is not available
  wget -q "https://files.rcsb.org/download/3DZQ.pdb"
  egrep "^LINK|^SSBOND|^CRYST1|^ATOM|^HETATM|^ANISOU|^TER" 3DZQ.pdb | grep -v " IFC " > start.pdb

  # currently deposited model (for comparison):
  fetch_PDB_gemmi 4TWN | tee fetch_PDB_gemmi.log
  ln -s r4twnsf.mtz deposited.mtz
  ln -s 4twn.pdb deposited.pdb

  cd ..
we should now have all relevant (deposited) data in the subdirectory Deposited.
Setting up working directory
Running
  mkdir Work
  cd Work

  # create some symbolic links for files to be used here
  ln -s ../Deposited/Images .
  ln -s ../Deposited/start.pdb .
  ln -s ../Deposited/deposited.pdb .
  ln -s ../Deposited/deposited.mtz .


  # getting some Grade2 restraint dictionaries
  # use "curl -O" instead of "wget" if the latter is not available
  wget https://www.globalphasing.com/buster/wiki/plugin/attachments/GPhLTutorials4TWN/B96.restraints.cif
will get us all required files:
- Images: directory with raw diffraction data
- start.pdb: starting model (since in the same crystal form as the new data, no molecular replacement calculation is necessary)
- deposited.mtz: deposited reflection data (to be used as a reference MTZ file in order to get the same test-set flags as the deposited model)
- deposited.pdb: deposited model (for comparison)
- B96.restraints.cif: restraint dictionary for compound
Computing a quick and simple set of BUSTER maps
To check if our software is correctly set up and configured, we can run
buster_maponly -p deposited.pdb -m deposited.mtz -o maponly.mtz | tee maponly.logto get a set of map coefficients in the maponly.mtz output file:
- 2FOFCWT/PH2FOFCWT: 2mFo-DFc electron density map using all observations (FP/SIGFP columns)
- 2FOFCWT_iso-fill/PH2FOFCWT_iso-fill: 2mFo-DFc electron density map using all reflections to the highest resolution limit of any observation (FP/SIGFP columns), i.e. any missing reflection within that isotropic cut-off surface (a sphere) will be set to DFc values (model-only).
- FOFCWT/PHFOFCWT: difference density
This will also report the R/Rfree-values for this model (against the deposited reflection data):
Rwork/Rfree/Rall = 0.1921 0.1925 0.1921
Re-processing raw diffraction data with autoPROC
This can be done in three different ways.
Without any prior information
process -I Images -d process.01 | tee process.01.lis
This has the advantage of avoiding any kind of bias towards the actual crystal form (cell/SG) of that dataset: sometimes the crystal form changes e.g. due to a co-crystallisation with a particular compound. However, if this dataset comes in previously observed crystal form, the associated cell/SG is not enforced - which can become relevant when not all screw-axes are observed (so processing derives at P21212 just because the last 2-fold screw was not measured) or when a particular setting is required.
If working within a larger project with several datasets, the correct SG/cell might have to be manually set/adjusted and a consistent set of test-set flags needs to be established afterwards.
With known cell and spacegroup information
  process -I Images \
          cell="55 38 74 90 102 90" \
          symm=P21 \
          -d process.02 | tee process.02.lis
This will enforce a specific cell/SG already at the indexing stage, which can be problematic if e.g. the unit-cell has doubled and the discarding of half of the (maybe weak) spots is thus enforced.
The test-set flags automatically created at the end of processing will not be consistent with any previously determined model/dataset (see use of check_indexing and add_freerflag.sh below).
With reference reflection data of known cell and spacegroup
  process -I Images \
          -ref deposited.mtz \
          -d process.03 | tee process.03.lis
Here we not only enforce a specific cell/SG (extracted from the MTZ file header: see e.g. mtzana deposited.mtz or gemmi mtz deposited.mtz output), but will also ensure that the newly processed data is consistently indexed (for spacegroups that allow different equivalent indexing solutions). Finally, the same set of test-set flags will be used and (if necessary) extended to the full resolution limits of the newly processed data.
Some "highlights" from the processing results in process.03/summary.html:
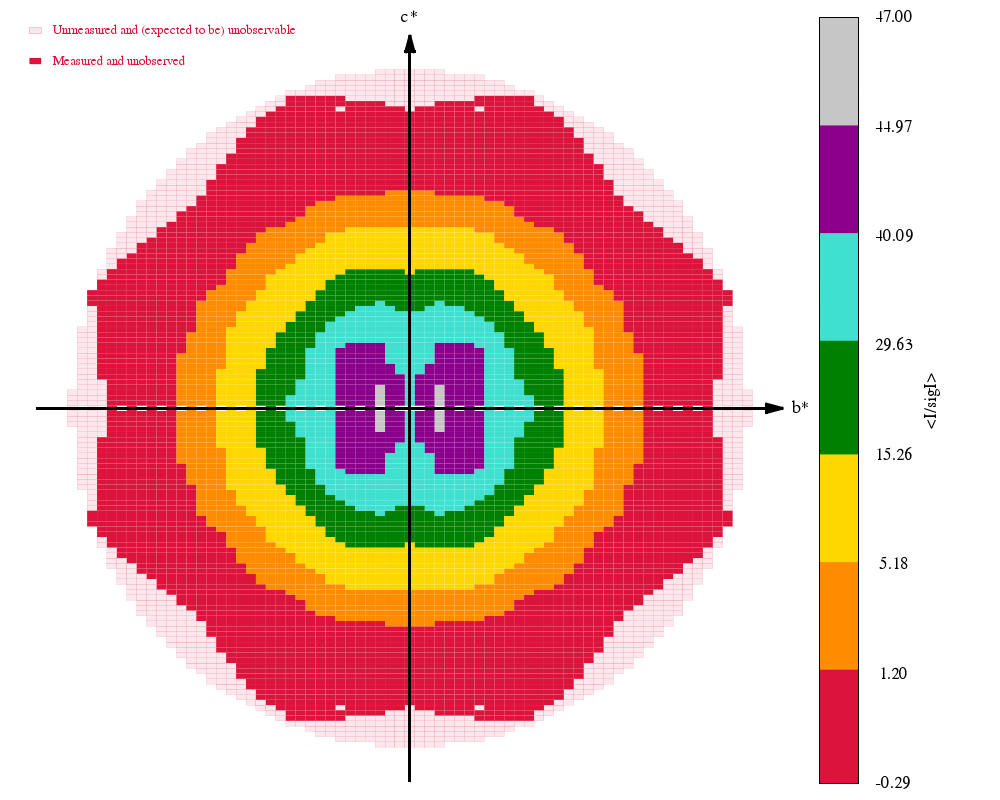 |
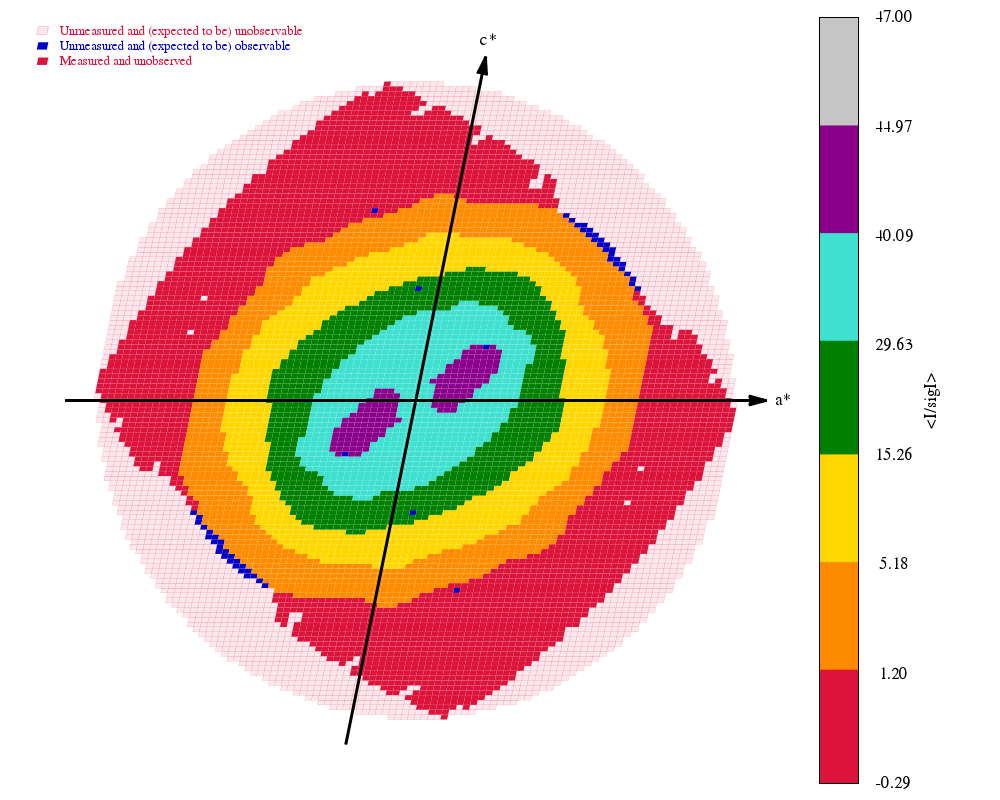 |
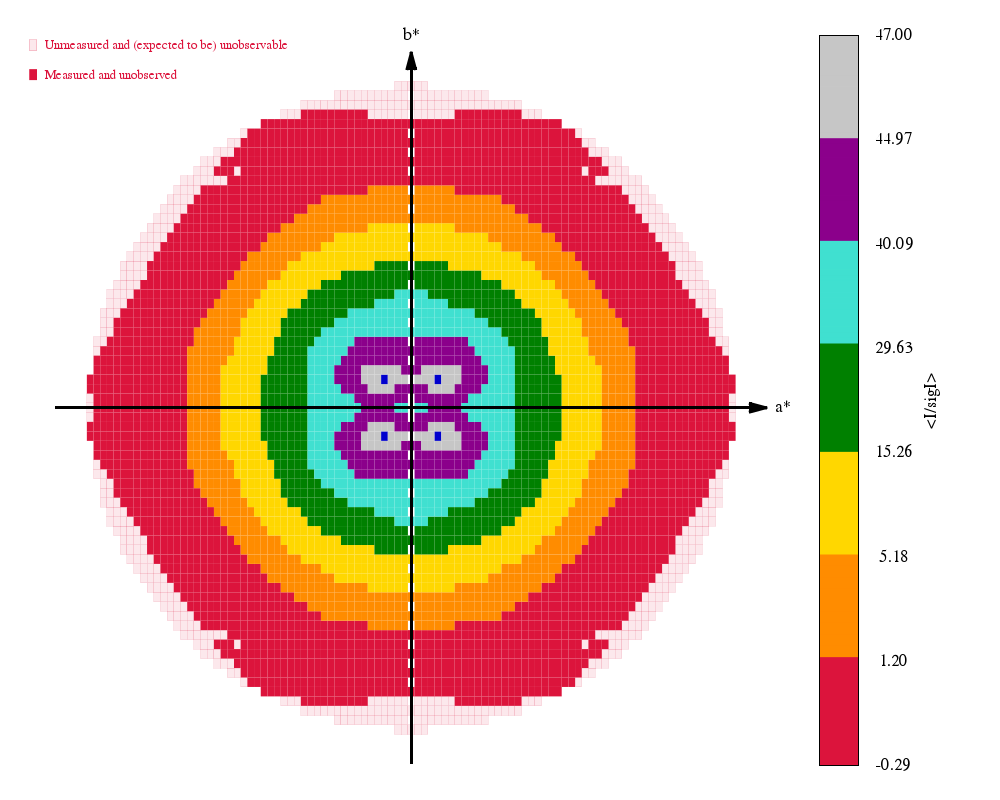 |
The final set of data-quality metrics ("Table 1"):
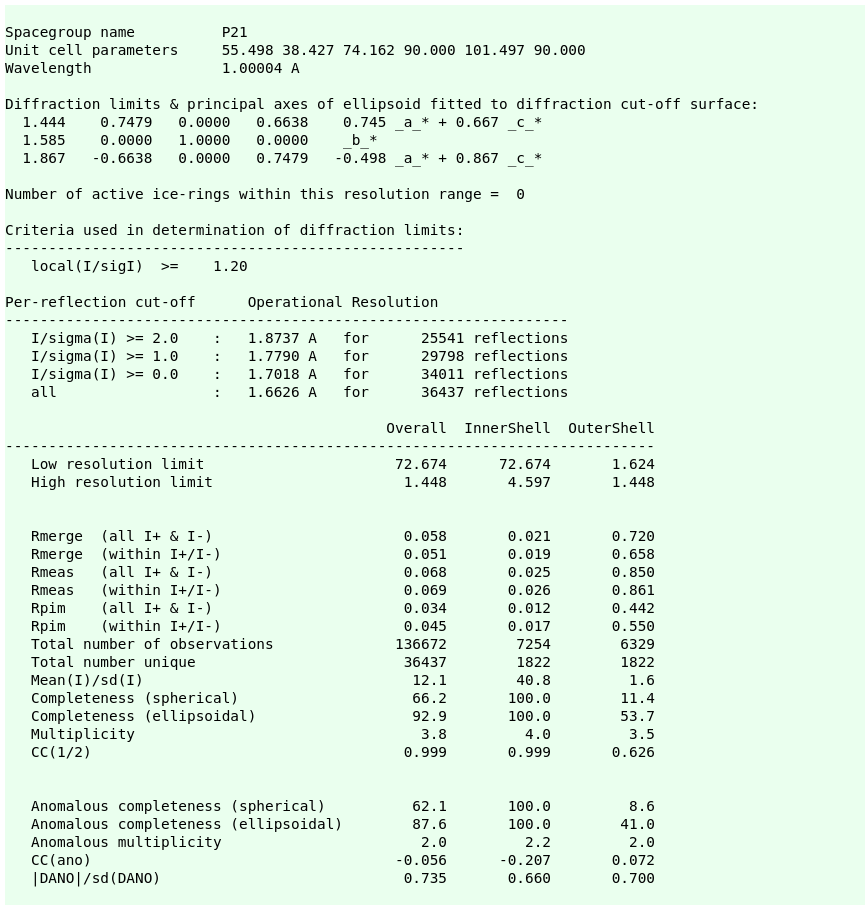
Compare these to the deposited values and the "Table 1" from the original paper: 4TWN_table1_paper.png (file not found)
This mode of processing is recommended when working within the same project and crystal form on a large number of datasets.
Checking symmetry/indexing (if required)
If no reference MTZ file was provided during data processing, the newly processed reflection data might require some transformations in relation to existing reference data. This can be done e.g. via
  check_indexing -v deposited.mtz process.01/staraniso_alldata-unique.mtz
  check_indexing -v deposited.mtz process.02/staraniso_alldata-unique.mtz
In the case here (P21 symmetry) nothing very interesting will happen: there are no alternative indexing possibilities, potentially missed screw axes or different settings.
Of course, there are other programs available to perform similar checks (see also our own aP_select_pdb for a variant): the important point is that any newly processed data should be consistent with any previously available data of the same crystal form to avoid confusion solely because of some trivial re-indexing or difference in settings.
Consistency of test-set flags
Within a larger project, the test-set flags for a given crystal form should be the same across different datasets. This ensures that Rfree-values computed even after a minimal amount of refinement are meaningful and not biased. We provide a simple tool (that internally runs the usual CCP4 programs which should be run after any indexing/setting ambiguity has been resolved:
  add_freerflag.sh -f deposited.mtz -m process.01/staraniso_alldata-unique.mtz
  add_freerflag.sh -f deposited.mtz -m process.02/staraniso_alldata-unique.mtz
If the reference file deposited.mtz was less complete (e.g. lower resolution) than the MTZ file, the test-set flag will be extended. This would happen afresh for every new dataset handled this way - which is why the creation of a highly-optimisitc reference MTZ file (with test-set flags to the highest resolution envisaged) wold be a good idea.
Refinement with BUSTER
Fully automatic refinement
The aB_autorefine interface to BUSTER will run a series of individual BUSTER refinement jobs with some automatic decision making in between (when to use TLS, ADP, solvent model update, outlier rejection etc). This is not a quick process, but provides a very consistent and reliable way of getting a large number of structures to a reasnoable state for subsequent analysis and manual adjustment.
In the current release of BUSTER, the resolution at which the initial rigid-body refinement is done can not be set (to a lower resolution in order to increase the radius of convergence). While this will be changed in an upcoming release, an intermediate solution is to first run the "limited molecular-replacement" tool provided by Pipedream:
lmr -xyzin start.pdb -hklin autoPROC/staraniso_alldata-unique.mtz
The resulting model file (MR/MR/phaser.3.pdb) should then be placed well enough to achieve a successful refinement via
  aB_autorefine \
          -p MR/MR/phaser.3.pdb \
          -m process.03/staraniso_alldata-unique.mtz \
          -d aB_autorefine.01 | tee aB_autorefine.01.log
Single BUSTER refinement run
A single BUSTER refinement run can be run using
  refine -RB 4.0 \
         -p start.pdb \
         -m process.03/staraniso_alldata-unique.mtz \
         -d refine.01 | tee refine.01.log
There are a lot of options available (see refine -h for details) for fine-tuning the behaviour, although we think that the defaults should be adequate for most situations. We start here with an initial rigid-body refinement (-RB flag) using only lower-resolution data, since the starting model (3DZQ) might need a slight re-arrangement, even if it is the same crystal form (unit cell parameters might have changed a little bit). Any subsequent refinements - e.g. after manual adjustments of the model - doesn't need to start with such a RB-refinement step of course.
Please note that this job will internally run BUSTER several times (so-called "big cycles", with updates to the solvent mask and the X-Ray weighting) and that before the last of those cycles a feature called "void correction" is activated (to account for cavities that should be excluded from the bulk solvent model).
Occupancy refinement with BUSTER
When one encounters alternate conformations (for side-chains, loops, solvent/buffer molecules or compounds/ligands), the occupancy can be refined through a two-step process in BUSTER:
  pdb2occ -p start.pdb -o start.occ
  refine -RB 4.0 \
         -p start.pdb \
         -Gelly start.occ \
         -m process.03/staraniso_alldata-unique.mtz \
         -d refine-occ.01 | tee refine-occ.01.log
The pdb2occ tool generates a so-called Gelly file that contains a full description about atom groups (which should have a combined occupancy refined) and atoms for which their occupancy should sum up to one. Here we create the instructions for four residues that are split into two alternate conformations (each with occupancy 0.5):
LYS A 614  A = 0.50  B = 0.50
ARG A 639  A = 0.50  B = 0.50
SER A 763  A = 0.50  B = 0.50
GLU A 822  A = 0.50  B = 0.50
After refinement we have
LYS A 614  A = 0.51  B = 0.49
ARG A 639  A = 0.32  B = 0.68
SER A 763  A = 0.25  B = 0.75
GLU A 822  A = 0.55  B = 0.42
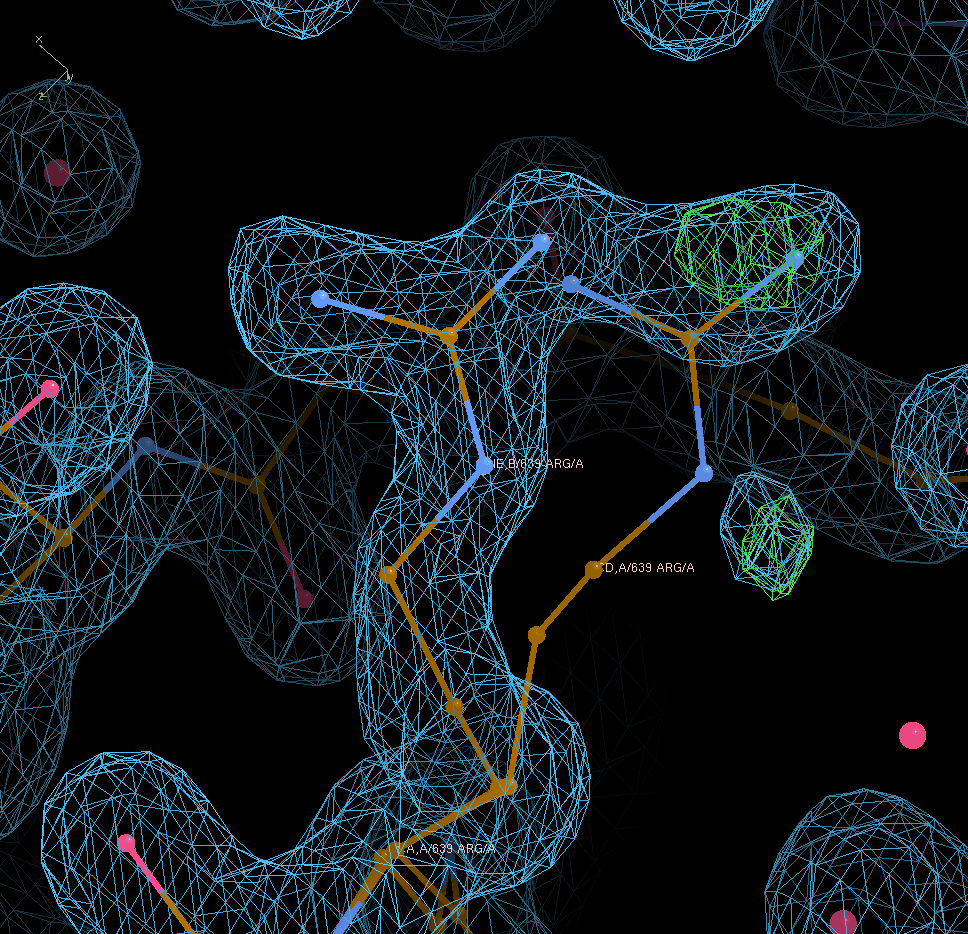
Looking at A639 shows that the occupancy value moves into the right direction (but also that the A conformer is probably not real):
The difference in overall statistics is obviously small: going from R/Rfree = 0.2256/0.2550 (when leaving at input occupancies of 0.5/0.5 for each of those side-chains) to values of 0.2255/0.2536 after refining those occupancies.
For more complicated patterns (alternate side-chain conformations with a partially bound ligand and an alternative water model) the file produced by pdb2occ can serve as a starting point to define the exact relation and grouping for subsequent refinement with BUSTER.
BUSTER refinement run for ligand detection
This uses the so-called -L feature (Vonrhein, C. and Bricogne, G., 2005. Automated Structure Refinement for High-Throughput Ligand Detection with BUSTER-TNT. Acta Cryst. Sect A, 61, p.c248.) as described in more detail here. The "Polder maps" in Phenix follow a similar idea.
  refine -RB 4.0 -L \
         -p start.pdb \
         -m process.03/staraniso_alldata-unique.mtz \
         -d refine-L.01 | tee refine-L.01.log
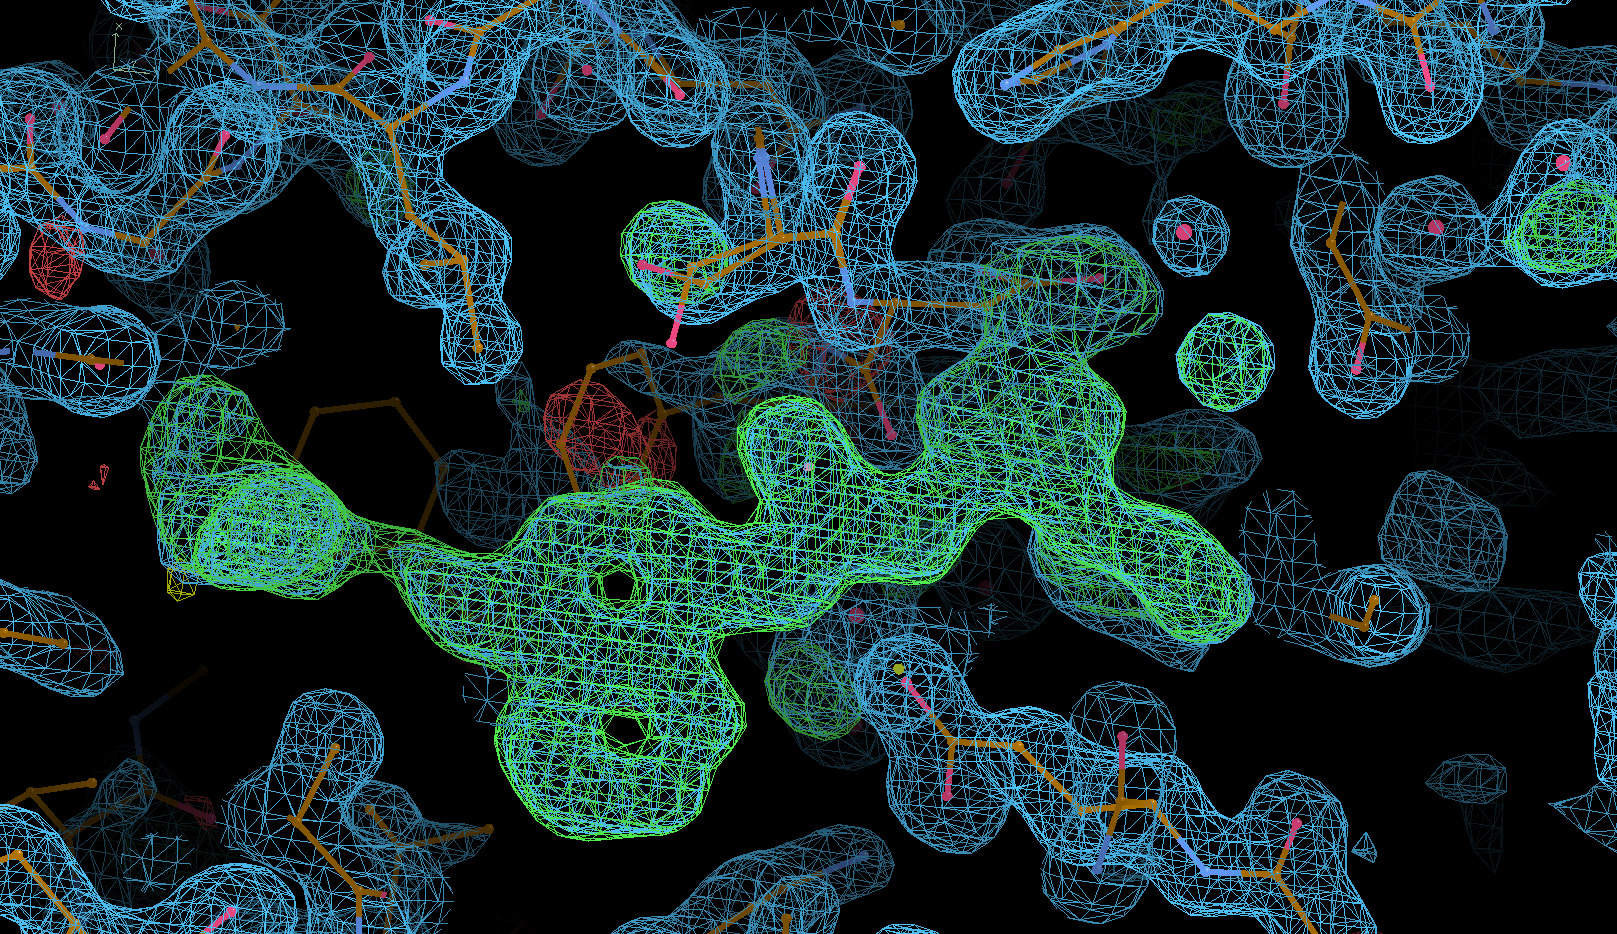
The result should hopefully be a clearer difference-density map for the bound ligand:
BUSTER refinement run with update of solvent model
It might be better to use aB_autorefine as a starting point for an updated solvent model, since it will run this only after the input model has gone through some additional refinement cycles (including RB, TLS etc). As a test (and for this tutorial) one could run
  refine -RB 4.0 -WAT 2 \
         -p start.pdb \
         -m process.03/staraniso_alldata-unique.mtz \
         -d refine-WAT.01 | tee refine-WAT.01.log
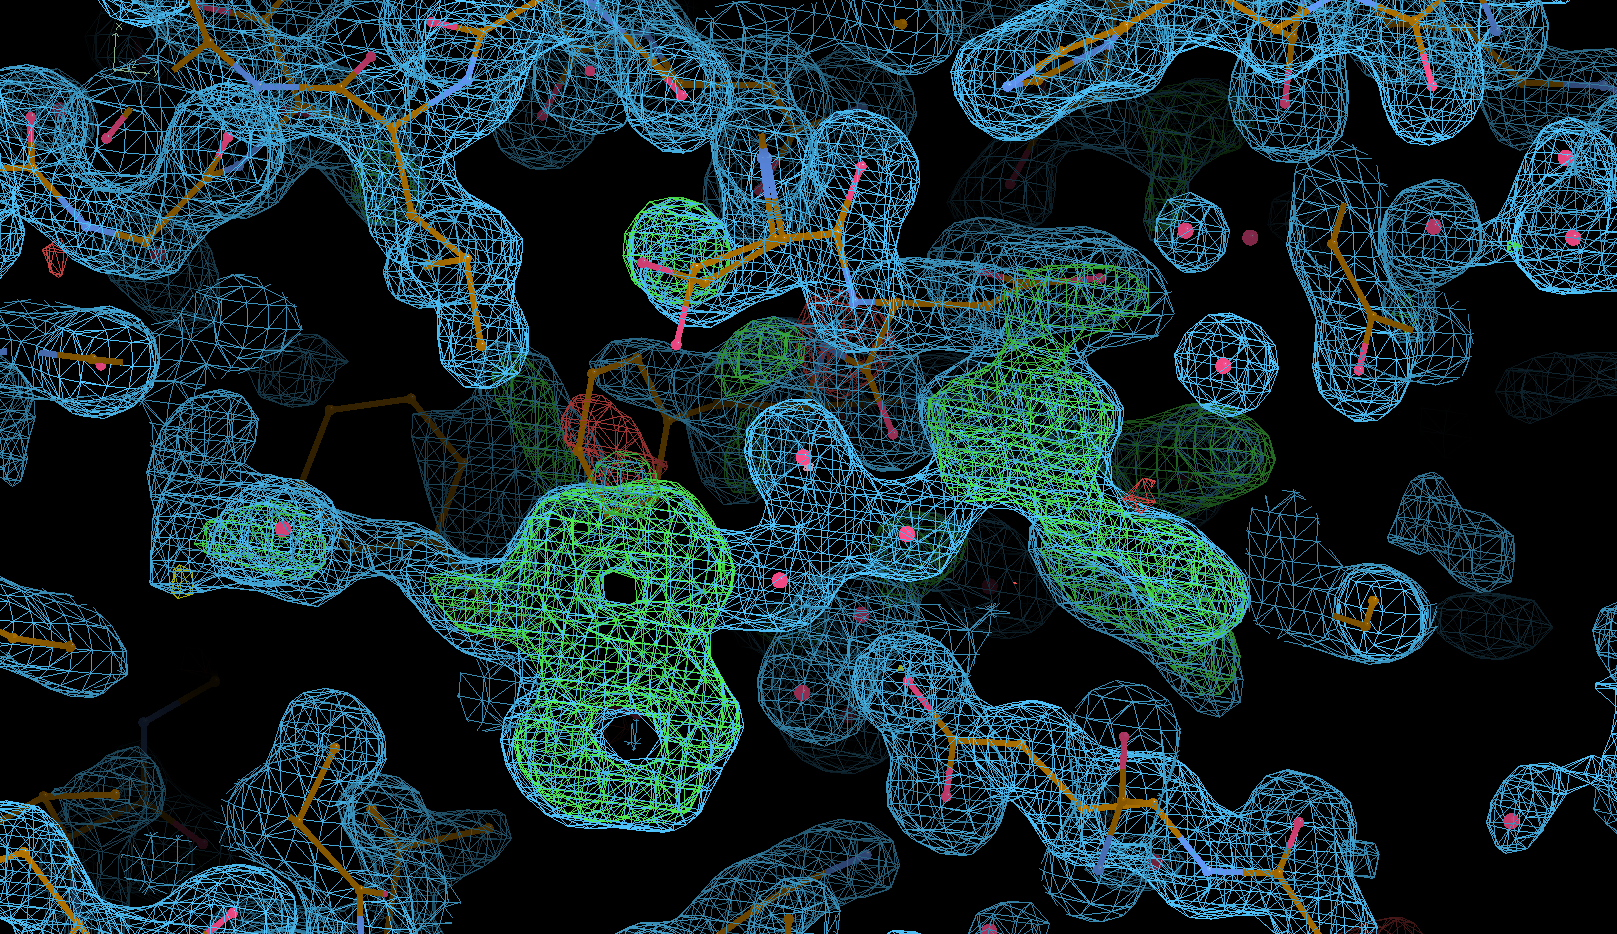
to (1) start with some rigid-body refinement and (2) switch on solvent update after big cycle 2. This might also place some "water" molecules into the not-yet-modeled ligand density:
Ligand restraint generation using Grade2
We will need a description of the ligand in form of a mmCIF restraints dictionary before we can try and fit the ligand into the (hopefully clear) difference density map that provides our evidence for a bound compound. There are several ways of generating those type of restraint files (and the different programs should create files that are compatible with each other), with Grade2 the latest incarnation of our own approach to this. If you have the required CSD software from CCDC installed, you should be able to run
grade2 -P B96(for a known identifier in the chemical components dictionary), or
grade2 -r B96 'Cc1ccc(cc1)n2nc(cc2NC(=O)Nc3ccc(OCCN4CCOCC4)c5ccccc35)C(C)(C)C'if using a SMILES string. Please also see the extensive Grade2 documentation and the Grade2 webserver.
Ligand fitting using RhoFit
We will be using the results of the BUSTER refinement in "ligand detection" mode:
  rhofit -l B96.restraints.cif \
         -p refine-L.01/refine.pdb \
         -m refine-L.01/refine.mtz \
         -d rhofit.01 | tee rhofit.01.log
The results can be visualised using
  cd rhofit.01
  visualise-rhofit-coot
Fully automatic data processing, model refinement and ligand fitting with Pipedream
Putting all of the steps above into a single system:
- data processing with autoPROC (consistent with provided reference information)
- limited MR (to ensure consistent placement of molecules)
- initial BUSTER refinement (to obtain best APO model against new dataset)
- ligand fitting using RhoFit
- final BUSTER refinement including ligand
- reporting of model and ligand quality using buster-report
It is very important to have a good starting/APO model for this procedure to give reliable results. Ideally, this should be a complete model refined (to convergence) against a high-quality dataset - for a crystal where the only difference is the lack of compound (e.g. a DMSO-only soak or such). The reference MTZ file needs to be consistent with this starting/APO model.
Starting from raw diffration data, APO model and reference MTZ (for cell/SG, indexing and test-set flags)
  pipedream -xyzin start.pdb \
            -hklref deposited.mtz \
            -imagedir Images \
            -rhofit B96.restraints.cif \
            -d pipedream.01 | tee pipedream.01.log
(this takes 32 minutes on a i9-13900 chip). The final model and ligand-fit can be visualised using
  coot --pdb pipedream.01/postrefine-*/refine.pdb \
       --auto pipedream.01/postrefine-*/refine.mtz \
       --dictionary B96.restraints.cif
Starting from already processed data, APO model and reference MTZ (for indexing and test-set flags)
  pipedream -xyzin start.pdb \
            -hklref deposited.mtz \
            -hklin process.03/staraniso_alldata-unique.mtz \
            -rhofit B96.restraints.cif \
            -d pipedream.02 | tee pipedream.02.log