Student level introduction to autoBUSTER tutorial
- This tutorial uses the refinement of a molecular replacement solution for the sulfotranferase SULT1A3 as an example for how to use autoBUSTER and what refinement actually involves.
- The tutorial is aimed to be most useful for those with little experience in refinement or model building with coot. Very basic model building in coot is covered.
- The first version of the tutorial was given in May 2007 to a group of postgraduate and postdoctoral scientists at the Biocenter at the University of Oulu. Many thanks for all involved and in particular BIOXHIT for funding
- The tutorial was revised for the VIZIER/SPINE2 workshop at the University of Vienna July 2008.
- And again for the ACA2010 workshop.
Background SULT1A3
- The sulfotransferase family of enzymes catalyze the transfer of sulfate ions from 3'-phosphoadenosine 5' -phosphosulfate (PAPS) to their substrates.
- The sulfotransferases are important in both hormone regulation and toxicology. See David Goodsell's Sulfotranseferase Molecule of Month
- The example chosen for this tutorial is to “solve” the structure of SULT1A3 using molecular replacement from the structure of estrogen sulfotransferase. The relevant pdb entries are
- structure to be “solved” pdb entry 2a3r. 2.6Å resolution Rwork 20.6%, Rfree 24.3% (pdb values). Two copies in the asymmetric unit. Protein has dopamine substrate and PAP (sulfate donor in product form) bound.
- template estrogen sulfotransferase (EST): pdb entry 1aqu, 1.6Å resolution, Rwork 21.8%, Rfree 25.1% (pdb values). This structure has estradiol (substrate) and PAP (sulfate donor in product form) bound:
- Aligning the sequences of the two proteins using the ebi EMBOSS align tool shows that they are homologous with around 48% sequence identity and 68% sequence similarity: needle_align_2ar3_1aqu.txt.
- Note that in reality 2ar3 was solved by molecular replacement from the more closely related (93% identity) SULT1A1 structure 1ls6 but we want a bit more of a challenge here. In particular it is instructive to see the difference density showing the SULT1A3 amino acids appearing.
Starting Files
- The BALBES program was used to perform the molecular replacement. BALBES is supplied with ccp4 It was run using the following command options.
balbes -o balbes_out -f 2a3r.mtz -m 1aqu.pdb -s 2a3r.fasta > balbes.log
- BALBES uses structure of 1aqu as a the search model. But the sequence of the model is changed to that in 2a3r.fasta (the one we want).
- BALBES uses the ccp4 molrep program to perform the molecular replacement step.
- To make it easier to compare the refinement at each stage with the deposited 2ar3.pdb model the BALBES structure was shifted into the pdb frame (supplied in table above).
(A) Using autoBUSTER to calculate an initial map for the SULT1A3 MR model
- Download the starting files for the exercise, if you have not already done so. It is best to do place the files into a fresh directory:
mkdir sult1a3_tutorial
cd sult1a3_tutorial
(download files here!)
- We will first use autobuster refine to calculate a map for the molecular replacement model.
- Note that in practice it is normal to refine an MR model before looking at its maps for reasons we will discover here.
- first look at the quick help for the autobuster refine with the commands:
refine -h | more
refine -M list
- 2011 update Also print out the buster reference card from DocumentationTopPage/buster_reference_card.pdf (file not found)
- to calculate a map you will need the options -p protein.pdb -m data.mtz -M MapOnly -d outputdir
- answer question A1 on your question sheet.
- calculate an initial map by:
refine -p balbes_molrep_2ar3frame.pdb -m 2a3r.mtz -d partA -M MapOnly > partA.log &
- note that we capture the output of refine into a log file using the > redirect. Also note that the job is put into the background by using &. If this is new to you have a look at the unix survival guide
- or for advanced users use this shell script partA.sh
- this takes around one minute on a modern workstation.
- Alternatively, rather than waiting you can download a tar ball of the result directory here partA.tgz. The tar ball can be unpacked by tar xzf partA.tgz
- when this has finished then start a quick refinement of the initial MR model so that it can be running while you are looking at the initial map. So jump forward and start the job in part (B), then come back here.
- first look at the output log file file:
less partA.log
- answer question A2 on your question sheet. If you do not know what Rfree is then see http://reference.iucr.org/dictionary/Free_R_factor
- Then run the coot program and load up the pdb file balbes_molrep_2ar3frame.pdb and the autobuster output mtz partA/refine.mtz (using "Auto Open MTZ").
- If you have not used coot much before see getting started with coot wiki page for help on this.
- then use the coot command "Draw" "Go to atom" to go to residue A 155 TRP. This residue is a TRP in sult1a3 but is a PHE in estrogen sulfotransferase. Answer questions A3,A4 & A5 on your question sheet. If you do not know the structure of amino acids, their 3 letter codes and their 1 letter codes then learn them: see wikipedia diagram
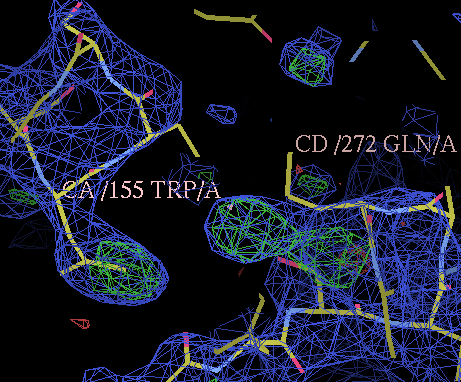
- then look at residue A 272 GLN that is adjacent to A 155 TRP and answer questions A6 to A9 on your question sheet.
- We will also try to see whether there is any large blob of density that has is not modelled in the MR model.
- In coot select "Validate" "Unmodelled Blobs", select the difference map and set the value to 3.0 sigma (as recommended):

- then click through the four blobs found.
- answer questions A10 to A14 on your question sheet.
- You should have just concluded that the unmodelled blob is likely to be for the PAP cofactor.
- We can use the EST structure 1aqu.pdb to see where this can be expected to be bound.
- Exit and then restart coot and load up the pdb file balbes_molrep_2ar3frame.pdb and the autobuster output mtz partA/refine.mtz (using "Auto Open MTZ") as before.
- Then load up the pdb file 1aqu.pdb.
- Zoom right out and you will notice that the two structures are not in the same region of space.
- So select "Calculate" "SSM superimpose" and select:
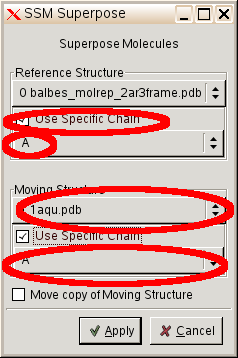
- answer questions A15 and A16 on your question sheet.
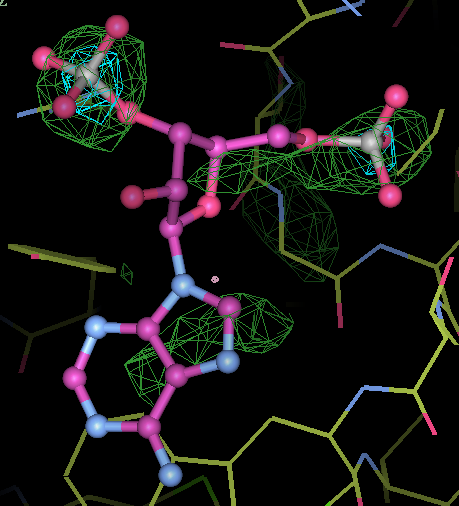
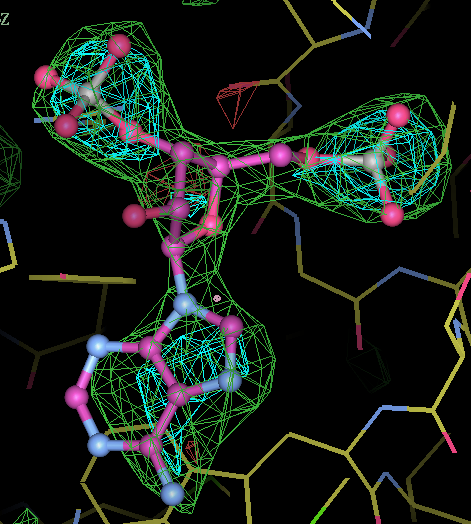
- This is my picture for A16. The difference density from the initial map is contoured at 3 sigma (green) and 5 sigma (cyan) together with expected binding position for the PAP molecule:
 center click to see enlarged picture
- So has the molecular replacement stage worked?
- The best guide of whether the MR has worked is whether the density shows features that indicate corrections that are not in the MR model (this is normally done after an initial refinement).
- the results on the two residues we looked at are encouraging but in this case the PAP density is an even better indicator.
- Note in this case the PAP could have be included in the molecular replacement. But we can use it in this to show refinement improves difference density to make missing or misbuilt parts of the molecule clearer.
(B) Using autoBUSTER to do a quick refinement from the SULT1A3 MR model
- In refinement we allow the model to better fit the X-ray data and to simultaneously improve its geometry by optimization.
- We can perform a quick refinement of the MR model by the command:
refine -p balbes_molrep_2ar3frame.pdb \
 -m 2a3r.mtz -d partB -autoncs        \
 -nbig 2 -nsmall 40 > partB.log &
- Note that we have chosen to do a quick refinement so that it is fast but it is much more appropriate to do a much longer run.
- or for advanced users use this shell script partB.sh
- this takes around five minutes on a modern workstation, so in the meantume answer the questions in part (A).
- Alternatively, rather than waiting you can download a tar ball of the result directory here partB.tgz. The tar ball can be unpacked by tar xzf partB.tgz
- Once this has finished lets first look at the top log of the job.
less partB.log
- look for any WARNING messages. These list geometry restraints that are really bad.
- answer questions B1 to B4 on your question sheet.
- looking at numbers in a table can be a bit difficult. One of the best ways to see what a refinement has done is to see a graph of Rfact and Rfree in the refinement. Draw one with the command:
graph_autobuster_R -launch-d partB
- you should see a graph like:
 center click to see enlarged picture
- answer questions B5 and B6 on your question sheet.
(C) Using autoBUSTER to do a long refinement from the SULT1A3 MR model
- As we have seen in (B) a short refinement is not enough to improve the model because it has a lot wrong with it. So it is a good idea to do a long refinement:
refine -p balbes_molrep_2ar3frame.pdb \
 -m 2a3r.mtz -d partC -autoncs        \
 -nbig 10 -RB > partC.log &
- or for advanced users use this shell script partC.sh
- Notice that we have specified -RB option this does one big cycles of rigid body refinement where each chain is the protein is moved into density as a single rigid body. This is a good idea when refining a molecular replacement solution.
- The run takes about 40 minutes on a modern workstation.
- Alternatively, rather than waiting you can download a tar ball of the result directory here partC.tgz. The tar ball can be unpacked by tar xzf partC.tgz
- Once this has run lets look at the what the refinement has achieved
- run graph_autobuster_R (see B) to get the Rwork/Rfree graph:
 center click to see enlarged picture
- answer question C1 on your question sheet.
- use less to look at partC.log and answer questions C2 and C3 on your question sheet.
- How far has the refinement moved the model?
- start coot and load the initial model balbes_molrep_2ar3frame.pdb and the final model partC/refine.pdb.
- in order to see what parts of the protein has moved the most, zoom out and then use the the Display Manager to select "CA and Ligands" Representation for both proteins.
 center click to see enlarged picture
- You will find that the movements are still not that clear because both molecules have similar colors.
- so select "Edit" "Bond Colours" and adjust the colors so that the start and end structure have distinct colors.
- Look for parts of the structure where partC refinement has moved the model the most. You can measure distances with the "Measures" "Distances and Angles" "Distance" tool. Once you have found a part where refinment has produced large movements then zoom in and select "Bonds (Colour by Molecule)" in the Display Manager.
- answer questions C4 and C5 on your question sheet.
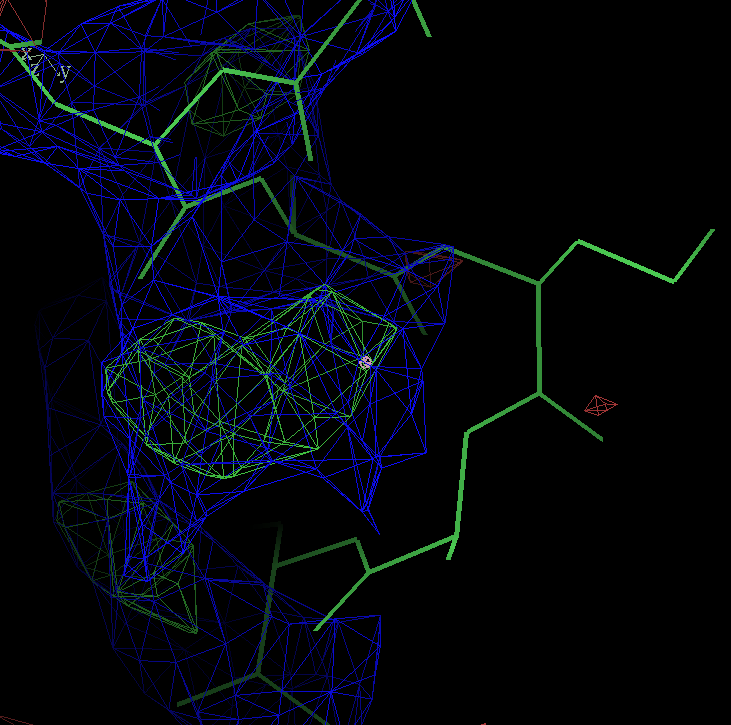
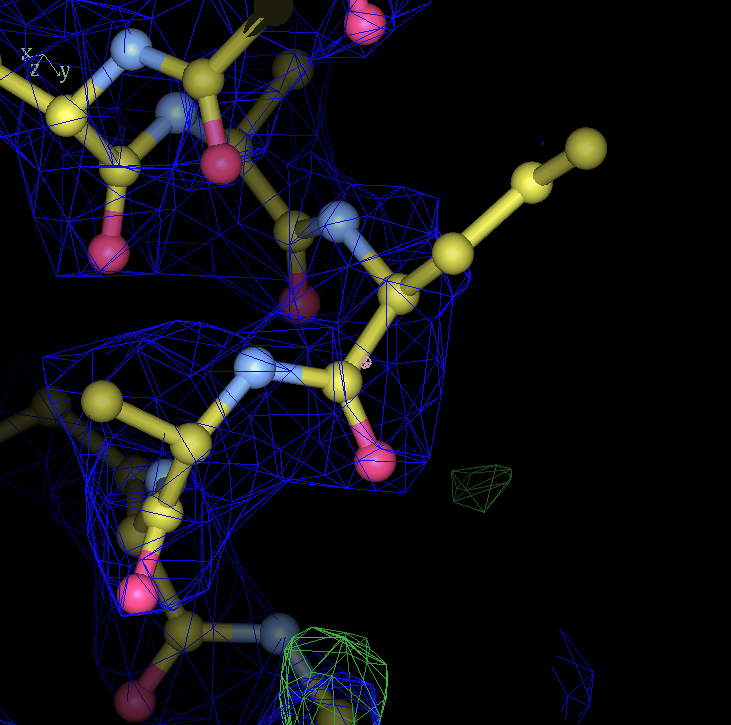
- my images for question C5: center click to see enlarged pictures
- caption: Refinement from the initial MR model shows large movements around residue A27. Left panel shows the initial model in green lines and the autoBUSTER refined model in ball lines. Center panel shows the initial model and its 2Fo-Fc map contoured at 1.5 sigma blue and difference map contoured at 3 sigma in green/red. Right panel shows the final model and maps. The green blob at the bottom of the model is due to residue A30 PRO being incomplete.
- What has refinement done to the difference density at the expected binding position for PAP. Stop coot then start it again. Repeat the procedure used for questions A15 and A16 but for the refined structure.
- answer question C6 on your question sheet.
- my images for question C6 center click to see enlarged pictures
- caption: Difference density for the unmodelled PAP compared to its expected position from 1aqu.pdb. On the left is the difference density from the initial MR solution. On the right the density after refinement is show. In both cases difference density contoured at 3 sigma is in green and 5 sigma in cyan. It should be noted that the PAP binding site is well conserved so that the density improvement is due to overall model improvement.
(D) Manually building three residues using coot
In part (C) we looked how autobuster refinement could move the existing incomplete protein model to better explain density.
Further progress in improving the model depends making sure it has the correct chemistry corresponding to its sequence. As a learning exercise we will do this for three residues by hand in coot before using an automated tool to correct the whole protein.
- Start coot and load in partC/refine.pdb and partC/refine.mtz (or start coot with command line coot -p partC/refine.pdb --auto partC/refine.mtz
- goto residue 30 from the A chain
- answer question D1 on your question sheet.
- Now lets correct the proline.
- coot's modeling tools are on the right hand menu.
- firsts lets select a map to model.
- Click on the "Map" button near the top:
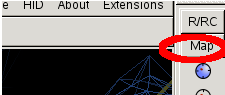
- Select the default 2Fo-Fc map Offered
- Then click on "Mutate and autofit" in the right hand menu:
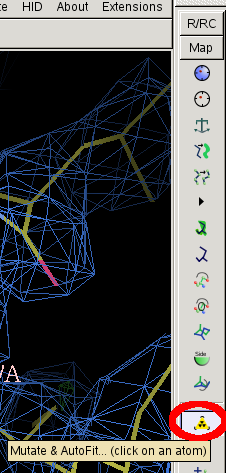
- Then left click any atom in PRO A30.
- from the menu that appears select PRO.
- Once you have changed an amino acid it is advisable to "Real space refine" the residue, the residue before it and the residue after it.
- So click on the "Real space refine" blue circle near the top of the build menu.
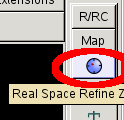
- Then click on any atom in residue A29 before PRO A30 and any atom the residue A30 after it.
- After you have done this you coot will real space refine the residue and present you with the result as a with lightened bonds, and offer you and "Accept", "Reject" dialog box:
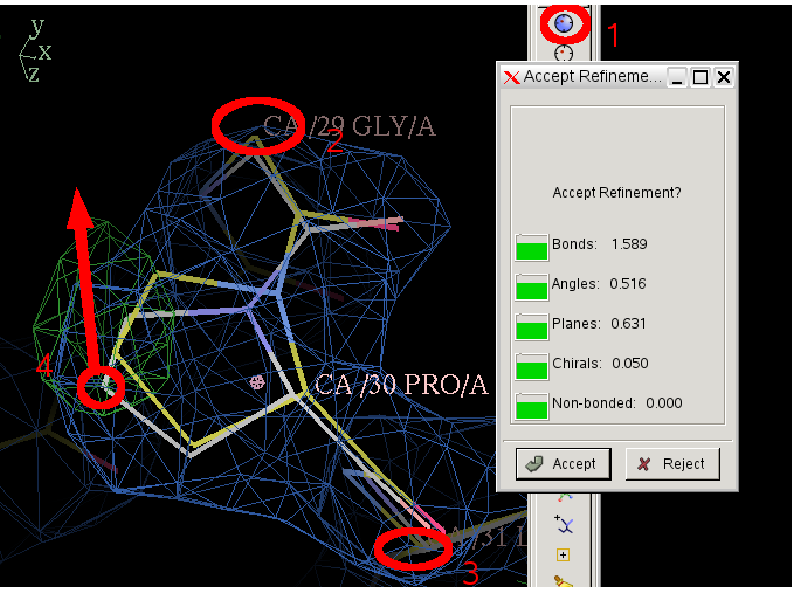
- In this state you can manually intervene by clicking on an atom and draging it towards where you think it should go. Try doing this.
- Then try holding the ctrl key and clicking dragging a carbonyl oxygen so that it flips.
- Once you have mucked up the structure so the "traffic lights" are not all green answer question D2 on your question sheet.
- So now you have made things worse by hand click "Reject". Then real space refine A30 and its adjacent residues again. This time coot gets it right and so click accept.
- Now repeat the procedure to place atoms and correctly place residue TRP A155.
- And do it again for residue GLN A272.
- You will notice that the density for TRP A155 is now much clearer than in the initial MR map (Question A5):
- When placing residue 272 consider its interactions with the ring nitrogen of the TRP you have just placed and the main chain nitrogen of residue 269:
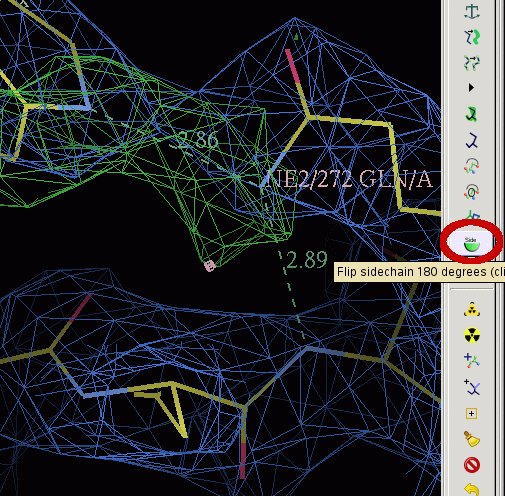
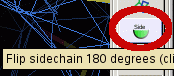
- Click on "Flip sidechain 180 degrees" button and the on residue 272. Then try it again.
- Which way around do you think the GLN should be placed? Answer question D3 on your question sheet.
- After you have rebuilt the three residues use the coot "File" "Save coordinates" to save as file partD_coot_rebuild.pdb. Here is my version: partD_coot_rebuild.pdb.
- Then you can check your placement is correct with a quick autobuster refine:
refine -p partD_coot_rebuild.pdb \
 -m 2a3r.mtz -d partD -autoncs        \
 -nbig 2 -nsmall 20 > partD.log &
- note that here we only specify 2 big cycles and 20 small cycle because we expect only small changes.
- or for advanced users use this shell script partD.sh
- this takes around 3 minutes on a modern workstation.
- Alternatively, rather than waiting you can download a tar ball of the result directory here partD.tgz. The tar ball can be unpacked by tar xzf partD.tgz
- Check whether there is any difference density around the changes you have made. Answer question D4 on your question sheet.
- It can be noted that the corresponding residue to TRP 155 is a PHE in EST (see 1aqu.pdb) and GLN 272 is a LEU. So this is an example of nature doing a double mutant experiment where two substitutions have been made that can hydrogen bond to one another.
- Half the residues in the partC model need building. Although doing so would teach us a lot about protein structure it would take a long time!
(E) Using coot automated tools to rebuild and refit all the side chains
- Lets try out coots automatic tools to refit the sidechains.
- Start a fresh coot with partC refine.pdb and refine.mtz loaded.
- Click on the "Map" button near the top:
- Select the default 2Fo-Fc map Offered.
- Then select "Extensions" "All molecule" "[post MR] Fill partial residues"

- Coot will then proceed and correct all side chains with missing atoms.
- Once this has finished use the coot "File" "Save coordinates" to save as file partE_coot_rebuild.pdb. Here is my version: partE_coot_rebuild.pdb.
- Start an autobuster refinement of this:
refine -p partE_coot_rebuild.pdb \
 -m 2a3r.mtz -d partE -autoncs        \
 -nbig 2 > partE.log &
- in this case 2 full big cycles is necessary as many 100's side chains have been built. Look at the BUSTER reference card -nbig 2 is defined as a Medium length refinement.
- or for advanced users use this shell script partE.sh
- this takes around 10 minutes on a modern workstation.
- You can use this time to answer question E1 on your question sheet.
- Alternatively, rather than waiting you can download a tar ball of the result directory here partE.tgz. The tar ball can be unpacked by tar xzf partE.tgz
- Once the refinement has finished load the molecule and map into coot.
- answer questions E2 and E3 on your question sheet.
(F) Using coot to clean up the model around 186 HIS
- We will now use to assess which parts of the model from part E need attention.
- Start a fresh coot and load partE/refine.pdb and partE/refine.mtz.
- Click on the "Map" button near the top:
- Select the default 2Fo-Fc map Offered.
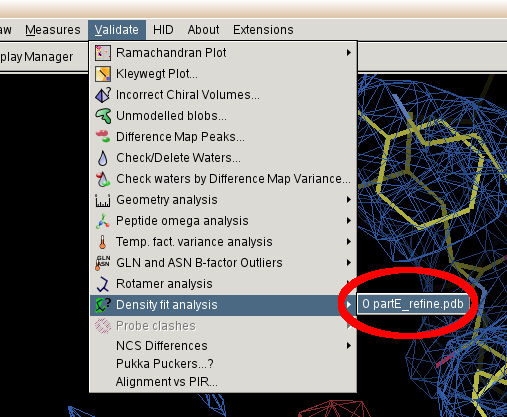
- The select "Validate" "Density Fit Analysis" "refine.pdb"
- You will then be presented with an interactive graph:
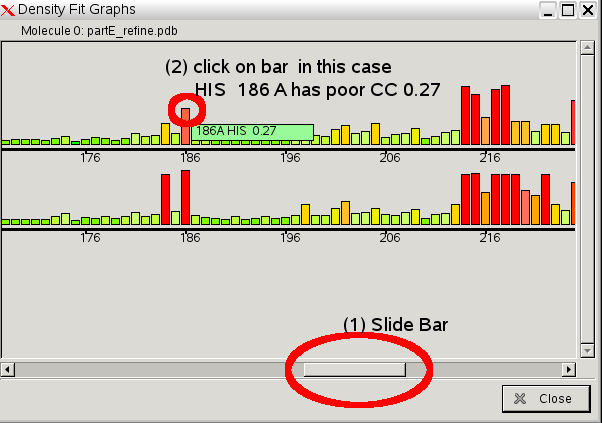
- The upper bar chart is for the A chain and the lower is for the B chain. Residues with a power fit to the density are marked by red or orange bars.
- Use the lower scroll bar to move along so you can see the graph around 186. Click on residue A 186 or B 186.
- The main coot window will show what is wrong with residue 186:
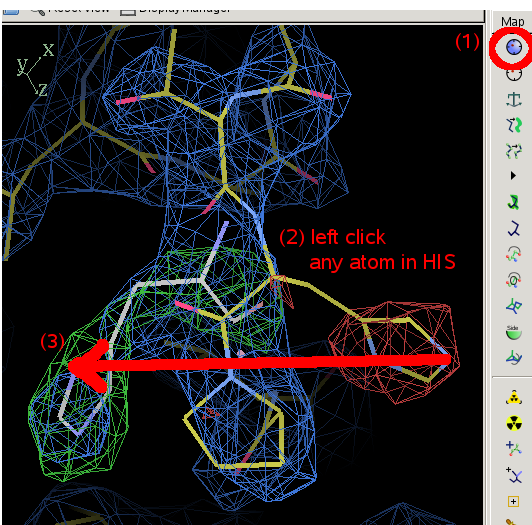
- Select 186 and drag it to the obvious density.
- Then real space refine 185, 186 and 187 to clear up the links.
- Check that the histidine side chain is making sensible hydrogen bonds. If necessary use the "Flip sidechain 180 degrees" button:
- Then do the same operations to fix up the corresponding residue in the B chain (B 186).
- Near this residue ARG B184 has no side chain density.
- Correct this by hitting the delete item button:
- Then select any atom in the offending ARG residue.
- Once this has finished use the coot "File" "Save coordinates" to save as file partF_coot_rebuild.pdb. Here is my version: partF_coot_rebuild.pdb.
- Start an autobuster refinement of this:
refine -p partF_coot_rebuild.pdb \
 -m 2a3r.mtz -d partF -autoncs        \
 -nbig 2 -nsmall 20 > partF.log &
- in this case 2 big cycles of 20 small cycles is more than enough as only a small amount has been revised in a BUSTER-refined structure.
- 2011 update The new ShortRunVoid macro has been written especially to cover this case. See AutoBusterShortRunMacros for a detailed discussion
- or for advanced users use this shell script partF.sh
- this takes around 3 minutes on a modern workstation.
- The Final Rfree is 28.0% compared to 28.9% in partE.
from here sketch of what needs to be done
(G) Clean up N terminii.
- delete side chain ARG A 9 then drag C terminus into difference density. Repeat for B except here remove THR B 7.
(H) Clean up C terminii.
(I) Clean loop around A 90
- Compare A 90 environment with B 90 and discuss NCS
- Draw "Cell and Symmetry" to see A90 contacts
- rebuild by look down 2 fold, turn off difference density and symmetry copy. Drag loop to be connected density.
(J) Place PAP in A and B chain
- Fit the PAP by eye in coot. Follow broadly Tom AutoBusterLigandAndOccRef
- Compare final result with that expected from 1aqu.pbd.
(K) build missing helix 65-72
- Density for this section slowly building.
(L) TLS refinement
(M) place dopamine.
- How certain we be about the placement?
Page by Oliver Smart original version 28 May 2008. Updated extensively July 2010, and Feb 2011. Address problems, corrections and clarifications buster-develop@globalphasing.com
 center click to see enlarged picture
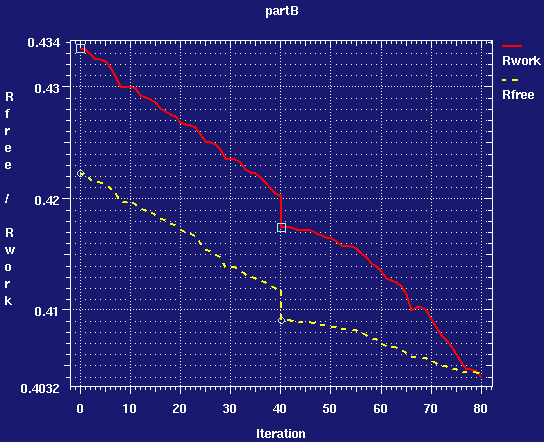 center click to see enlarged picture
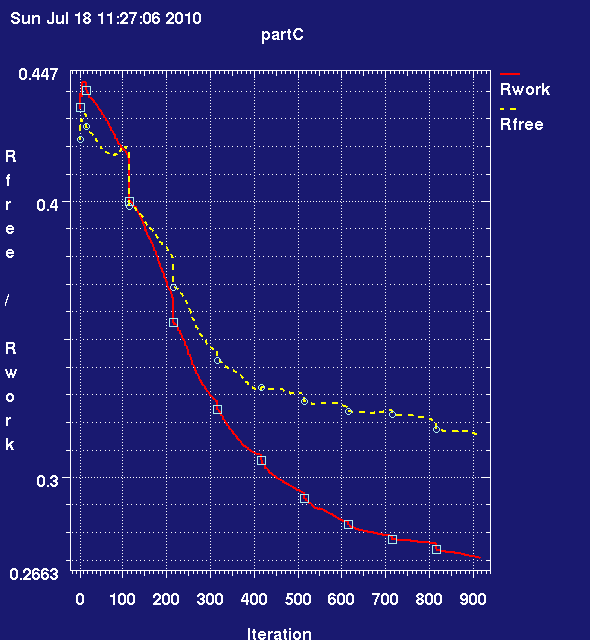 center click to see enlarged picture
 center click to see enlarged picture
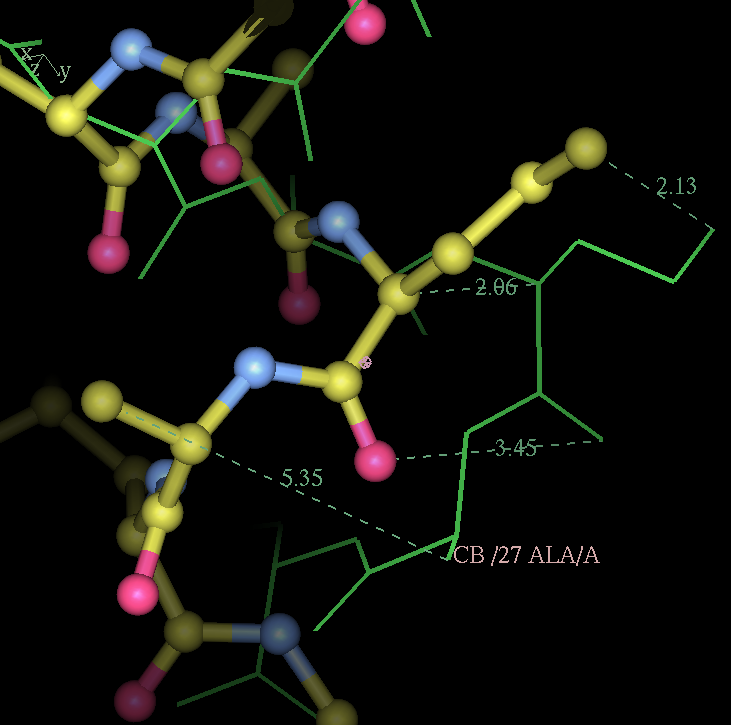